


Ever wondered how rough, dull concrete floors are transformed into mirror-like surfaces, or how a raw slab of granite gets its signature, luxurious sheen? The secret lies in a powerful and precise tool: the diamond polishing pad. These unassuming discs are the workhorses behind the stunning, glossy finishes on stone, concrete, and other hard surfaces. Understanding what they are and how they work is the first step to achieving professional-grade results on your own projects.
This comprehensive guide will demystify diamond polishing pads, covering everything from their basic composition to advanced selection and usage techniques. Whether you’re a DIY enthusiast tackling a concrete countertop or a professional contractor aiming for the perfect granite polishing, this article is your universal resource for mastering the art of the polish.
What Are Diamond Polishing Pads?
At their core, diamond polishing pads are abrasive discs designed for grinding, honing, and polishing hard materials. Unlike sandpaper, which uses minerals like aluminum oxide, these pads are embedded with microscopic, industrial diamonds. Because diamond is the hardest known natural material, it can effectively scratch and wear away surfaces like granite, marble, and cured concrete, which would quickly destroy conventional abrasives.
These pads attach to specialized tools like angle grinders, floor polishers, or handheld wet polishers. They are used in a sequential process, starting with a coarse pad to remove imperfections and ending with a very fine pad to create a high-gloss, reflective shine. They are the essential tool for everything from initial surface preparation to achieving that final, flawless glossy finish.
How Do Diamond Polishing Pads Achieve a Polish?
The process of polishing with diamond pads is not about applying a coating; it’s about mechanical refinement. A diamond polisher and its attached pad work by progressively replacing one set of scratches with a finer, smaller set of scratches. This systematic process is often referred to as following the grit ladder.
- Grinding (Coarse Grits): The initial, low-grit pads (e.g., 50, 100 grit) have larger diamond particles. They aggressively remove stock, level the surface, and eliminate deep scratches, saw marks, or stains.
- Honing (Medium Grits): As you move up to medium grits (e.g., 200, 400 grit), the diamond particles become smaller. These pads remove the scratches left by the previous coarse grits, resulting in a smooth, matte, or satin finish.
- Polishing (Fine Grits): The high-grit pads (e.g., 800, 1500, 3000 grit) contain microscopic diamond particles. They refine the surface to such a degree that it begins to reflect light, creating a deep, lustrous, and glossy finish.
Each step is crucial. Skipping a grit will leave behind the deeper scratches from a previous step, making it impossible to achieve a true, uniform polish. The goal is to methodically smooth the surface until the scratches are too small for the naked eye to see.
The Key Components: Industrial Diamonds and Bonding Agents
The performance of a diamond polishing pad is determined by two primary components: the quality of the diamonds and the type of bonding agent used to hold them in place.
Industrial Diamonds
These are not jewelry-grade diamonds but synthetic diamonds manufactured for their superior hardness and abrasive qualities. The concentration, size, and quality of these industrial diamonds directly impact the pad’s cutting speed and lifespan. Higher-quality pads, like those offered by DFT,Diamondfloortools, use premium diamonds for more efficient and consistent results.
Bonding Agents
The bonding agent is the matrix that holds the diamond particles. The bond is designed to wear away at a controlled rate, exposing new, sharp diamonds to the work surface. The two main types are resin bond and metal bond.
- Metal Bond: These pads feature diamonds sintered into a hard, durable metal matrix. They are extremely aggressive and long-lasting, making them ideal for the initial grinding stages of concrete polishing. They are typically used for grits from 30 to 200. On a larger scale, these are often found on a heavy-duty grinding plate for floor machine applications.
- Resin Bond: These pads use a softer resin matrix. They are more flexible and provide a finer scratch pattern, making them perfect for the honing and polishing stages (typically 100 grit and higher). They are the go-to choice for achieving a high-gloss finish on concrete, granite, and marble polishing projects.
Comparison: Metal Bond vs. Resin Bond
| Feature | Metal Bond Pads | Resin Bond Pads |
|---|---|---|
| Primary Use | Initial grinding, stock removal, surface leveling | Honing, polishing, achieving high gloss |
| Grit Range | Very Coarse (e.g., 16, 30, 50, 100) | Coarse to Very Fine (e.g., 50, 100, 400, 800, 3000+) |
| Durability | Extremely high, long lifespan | Moderate, wears faster than metal |
| Application | Mainly concrete and very hard stone | Concrete, granite, marble, terrazzo, and other stone surfaces |
Types of Diamond Polishing Pads: Wet vs. Dry
One of the most critical decisions is whether to use wet or dry polishing pads. Each has distinct advantages and is suited for different environments and materials.
Wet Polishing Pads
As the name suggests, these pads require water as a lubricant and coolant during the polishing process. The water helps flush away the abrasive slurry (dust mixed with water), preventing the pads from overheating and glazing over. This results in a higher-quality polish, increased pad longevity, and a dust-free working environment.
Pros: Superior finish, longer pad life, no airborne dust, faster polishing on some materials.
Cons: Messy due to water slurry, requires a water-fed polisher, risk of electrical shock if not using a GFCI-protected tool.
Dry Polishing Pads
Dry pads are engineered with a heat-tolerant resin bond that allows them to be used without water. They are ideal for job sites where water is impractical or for projects where mess is a major concern. While convenient, they generate a significant amount of hazardous dust, requiring the use of a vacuum and a respirator.
Pros: No water mess, can be used with a standard angle grinder, convenient for quick jobs or touch-ups.
Cons: Shorter pad life, risk of overheating the pad or scorching the stone, significant dust creation requiring respiratory protection.
Comparison: Wet vs. Dry Polishing
| Feature | Wet Polishing | Dry Polishing |
|---|---|---|
| Finish Quality | Highest possible, superior clarity and depth | Very good, but may not achieve the same depth as wet |
| Dust Control | Excellent, dust is contained in water slurry | Poor, creates significant airborne dust (requires dust shroud and vacuum) |
| Pad Lifespan | Longer due to cooling effect of water | Shorter due to heat buildup |
| Best For | Professional results, granite countertops, marble floors, large projects | Job sites without water access, small repairs, DIY concrete polishing projects |
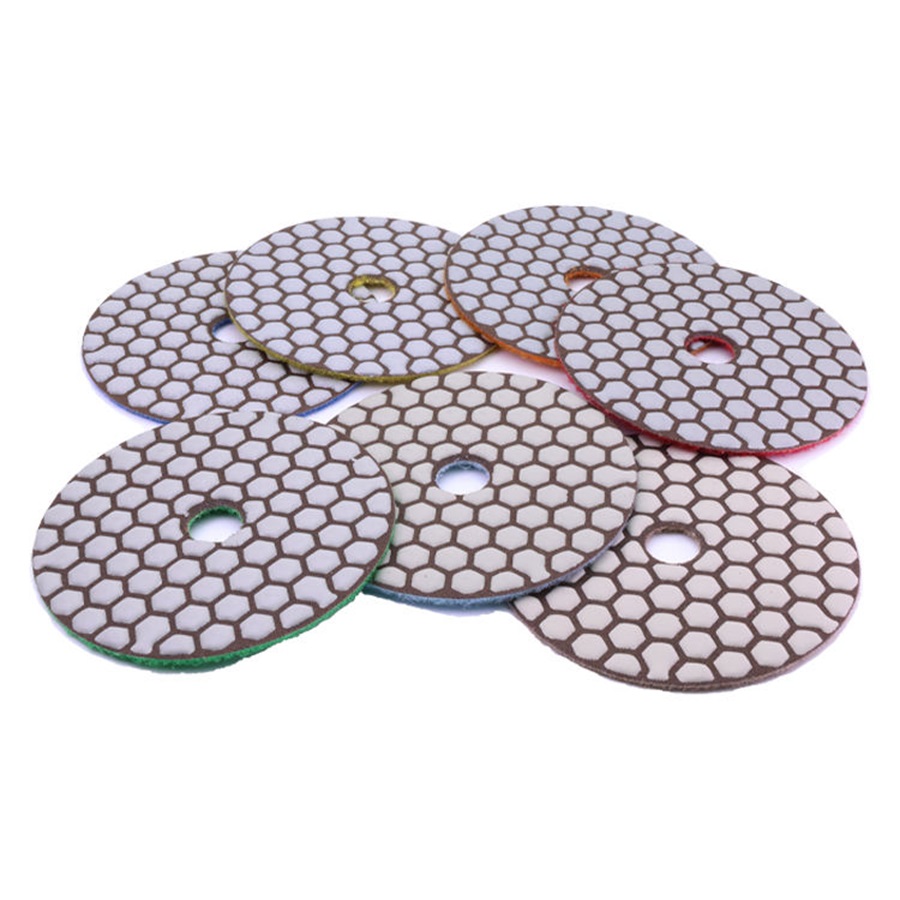
Understanding Diamond Pad Grits and Color Codes
To navigate the grit ladder effectively, it’s essential to understand grits and their common color codes. While colors can vary slightly between manufacturers, there is a general industry standard that provides a helpful visual cue.
What do the different colors of polishing pads mean?
The color of a polishing pad typically indicates its grit number. This system helps users quickly identify the next pad in the sequence without having to read the fine print on the back. A lower grit number means larger diamond particles and more aggressive cutting, while a higher grit number means finer particles for polishing.
Visual Guide to Grits and Common Colors:
- 50 Grit (Coarse): Often Green or Black – Used for aggressive stock removal on concrete or rough-sawn granite.
- 100 Grit (Coarse): Often Black or Red – Removes the deep scratches from the 50 grit step.
- 200 Grit (Medium): Often Red or Blue – Smooths the surface and prepares it for honing. The surface will have a very low sheen.
- 400 Grit (Medium): Often Yellow – This is the first honing step. It removes all previous scratches and creates a smooth, matte finish.
- 800 Grit (Fine): Often White or Light Blue – The first true polishing step. A noticeable sheen and reflection will appear.
- 1500 Grit (Very Fine): Often Brown or Light Green – Refines the sheen and increases the clarity of the reflection.
- 3000 Grit (Very Fine): Often Orange or Light Gray – Produces a deep, high-gloss, “wet look” finish.
- Buff Pad: Often Black (for dark stone) or White (for light stone) – A non-abrasive pad used with a polishing compound to achieve the final, mirror-like shine.
A complete concrete polishing pads kit will typically include this full range of grits, allowing you to progress seamlessly from a raw surface to a brilliant polish.
Common Applications: What Materials Can You Polish?
Diamond polishing pads are incredibly versatile, but they are designed for very hard materials. Using them on soft materials like wood or plastic will destroy the surface instantly.
Primary Materials:
- Concrete: The most common application, from warehouse floors to decorative countertops and patios. The best diamond polishing pads for concrete are often a combination of metal bond for initial grinding and resin bond for polishing.
- Granite: Ideal for polishing kitchen countertops, vanities, and floor tiles. Wet pads are strongly recommended for granite polishing to avoid heat damage and achieve the best clarity.
- Marble: Used for restoring the shine on marble floors, showers, and statues. Marble polishing requires a delicate touch, as it’s softer than granite and can be scratched more easily.
- Terrazzo: Diamond pads are perfect for restoring old terrazzo floors to their original luster.
- Other Stone Surfaces: This includes quartz, travertine, and limestone. It’s crucial to know the hardness of the specific stone to choose the right pads and approach.
How to Choose the Right Diamond Polishing Pad for Your Project
Selecting the right pad involves considering the material, the desired finish, and your equipment. Here is a simple flowchart to guide your decision.
Pad Selection Flowchart:
- What material are you polishing?
- Concrete: Start with aggressive metal-bond pads (30-50 grit) if the surface is rough or uneven. If smooth, you can start with 100-200 grit resin pads. Use a full grit sequence up to 3000 for a high gloss. Both wet and dry pads work, but wet is better for large floors.
- Granite: Always use wet pads if possible. Start with 100 or 200 grit for an existing surface, or 50 grit for a rough edge. Progress up to 3000 grit and finish with a buff pad for a deep shine on countertops. A 5 inch diamond polishing pads for angle grinder setup is common for this.
- Marble: Use wet pads. Marble is softer, so you can often start with a 200 or 400 grit pad. Be gentle and keep the polisher moving to avoid creating low spots. Polishing up to 1500 or 3000 grit is usually sufficient.
- What is your desired finish?
- Matte/Honed Finish: Stop at 400 grit.
- Satin/Low-Sheen Finish: Stop at 800 grit.
- High-Gloss Finish: Continue to 1500 or 3000 grit.
- Mirror/Wet-Look Finish: Use the full sequence up to 3000 grit, then use a final buff pad with a polishing compound.
- What is your work environment?
- Indoor, finished space (e.g., kitchen): Wet polishing is preferred for dust control, but requires careful water management. Dry polishing with a full dust shroud and HEPA vacuum is an alternative.
- Outdoor or workshop: Wet polishing is ideal. If water isn’t available, dry polishing is feasible with proper respiratory protection.
Step-by-Step: How to Use Diamond Polishing Pads
Here is a general guide to the polishing process. Always refer to your tool’s manual and the pad manufacturer’s recommendations.
- Safety First: Put on your Personal Protective Equipment (PPE). This includes safety glasses, gloves, hearing protection, and a respirator (especially for dry polishing). Ensure your polisher is connected to a GFCI outlet.
- Surface Preparation: Clean the surface thoroughly to remove any dirt, grease, or debris. For concrete, you may need to fill any cracks or pits before you begin.
- Attach the First Pad: Secure the lowest grit pad (e.g., 50 or 100 grit) to the hook-and-loop backing plate on your polisher.
- Begin Polishing: If wet polishing, turn on the water feed to a slow, steady stream. Keep the polisher flat